Setting up a VPN Server on RouterOS/Mikrotik

A new year, a new post 🙂
This year I’m starting with something completely non-PowerShell related for a change.
For a while now I’ve wanted to set up a VPN server at home for various reasons such as
- Access to home Hyper-V lab
- Secure internet access when using insecure WiFi
- Access to other home resources [Synology etc]
Now I finally had some time over the holidays to play around with it, but to be honest found out that it was quite the pain, as all information I found was simply not complete as turns out. So I thought what better way to solve that problem and to document it for future reference by making a blog post on the subject 🙂
Do note that I’m definitely not an expert on networking, so
What are we working with?
Well, my network isn’t all too fancy, but for the sake of clarity here’s an overview of my network layout
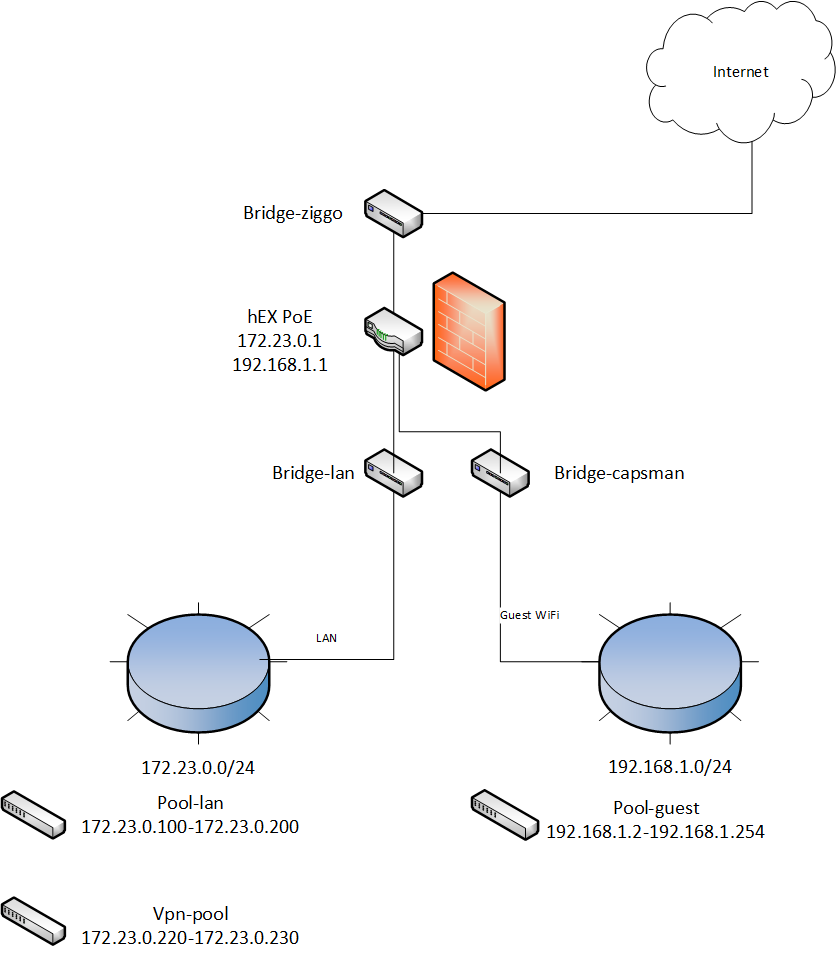
The following hardware is used for this setup:
- hEX PoE router
- 2x hAP ac lite Access Points
I’ve created bridges for my WAN, my LAN and my Guest so I can easily assign rules/access to each part as needed.
As for the VPN connection, while I first thought about using OpenVPN, I ended up going for L2TP/IPSEC instead, as OpenVPN is not yet fully supported and configuration requirements for L2TP/IPSEC are a bit easier [no certificate requirements etc].
Ok, let’s do this!
In order to set this up, we need to first create some pre-requisites and then put them all together. For clarity sake I’ll list the required steps here:
- L2TP
- Create an address pool which can be used by your VPN clients
- Create a VPN profile to be used by your L2TP server/users
- Configure the L2TP server
- Create a fixed Interface binding
- Create a VPN User
- IPsec
- Modify the default IPsec Policy Proposal
- Modify the default IPsec Peer Profile
- Create an IPsec Policy
- Create an IPsec Peer
- Firewall
- Input rules to allow L2TP traffic
- Forward rules to provide LAN and Internet access
- ARP
- Set proxy-arp to make sure you can access your other LAN devices properly
L2TP
Create an address pool
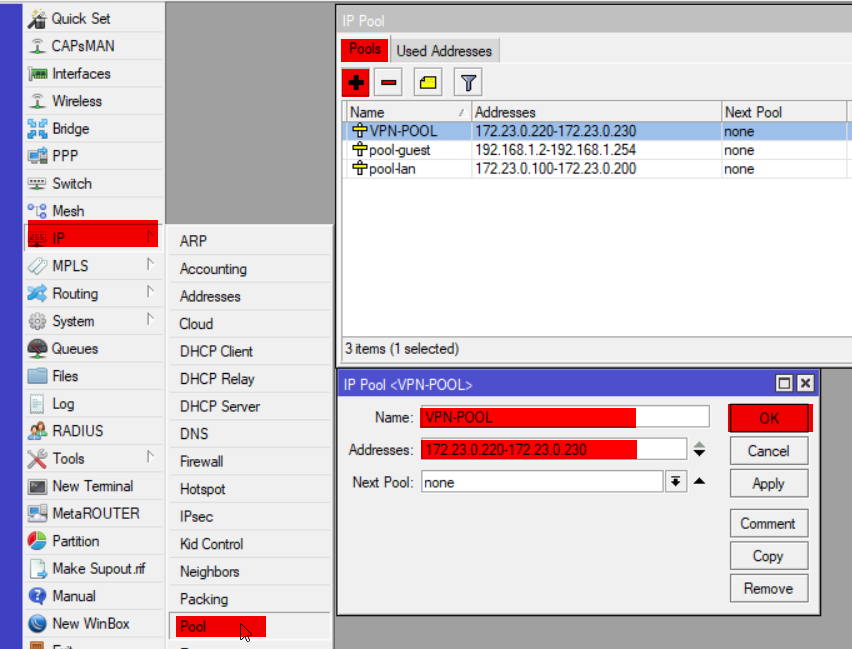
ip pool add name=VPN-POOL ranges=172.23.0.220-172.23.0.230
Create a VPN Profile
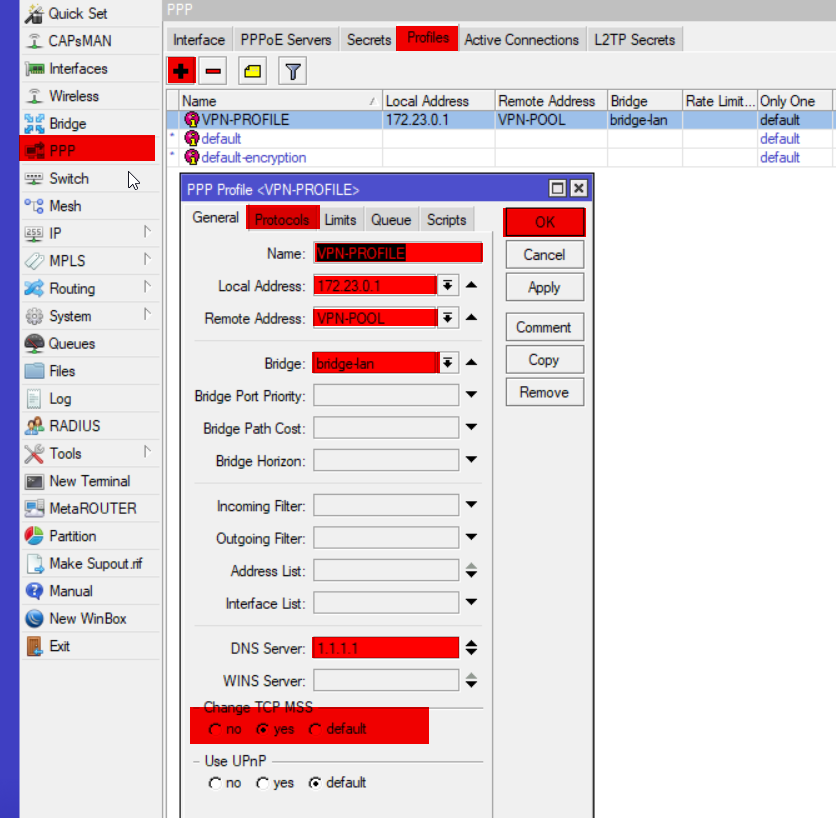
ppp profile add name=VPN-PROFILE local-address=172.23.0.1 remote-address=VPN-POOL bridge=bridge-lan dns-server=1.1.1.1 change-tcp-mss=yes use-encryption=yes
Configure L2TP Server
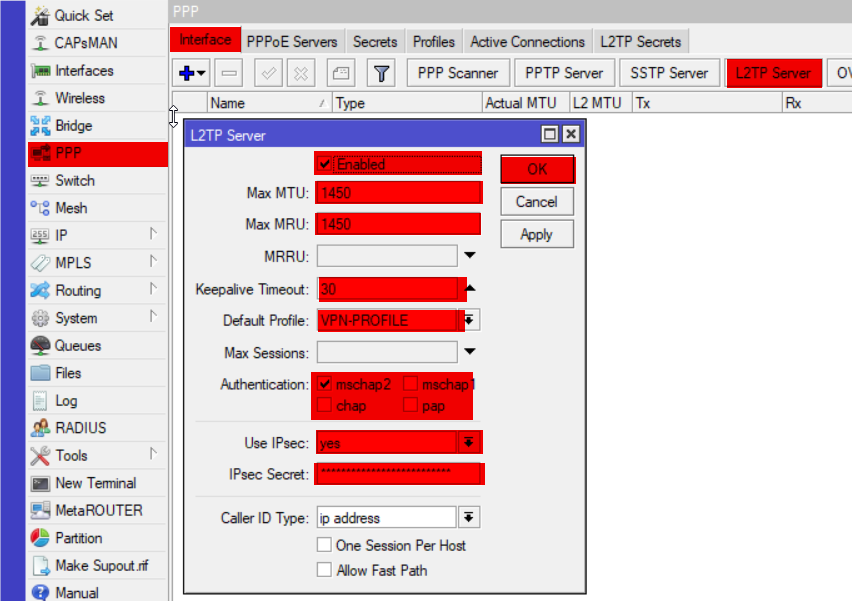
interface l2tp-server server set enabled=yes max-mtu=1450 max-mru=1450 keepalive-timeout=30 default-profile=VPN-PROFILE authentication=mschap2 use-ipsec=yes ipsec-secret=InsertSecretKeyHere
of course be sure to replace InsetSecretKeyHere with your own key 🙂
Create a static binding
Now this isn’t a requirement, but I think it helps with maintenance and the configuration of the firewall later on, so I thought I’d include it

interface l2tp-server add name=L2TP-VPN
if you want to you can add user=<username> to create static bindings per user
Create a VPN user
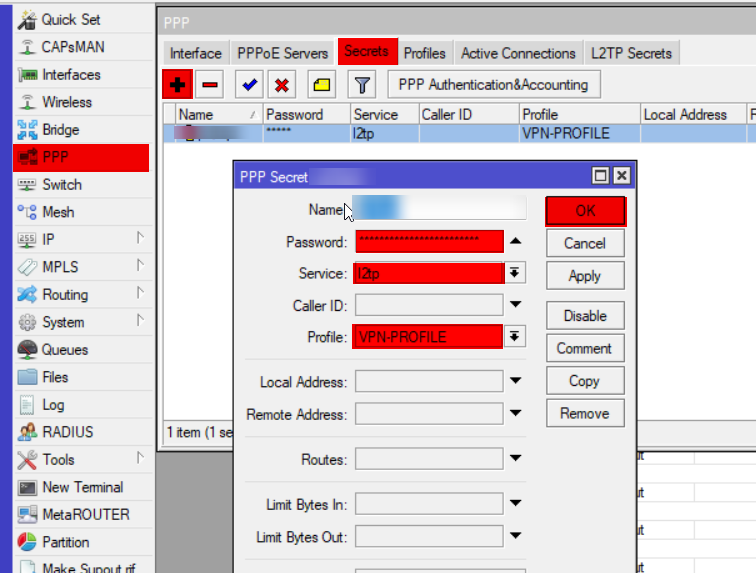
ppp secret add name=YourUserName password=YourSecretPassword service=l2tp profile=VPN-PROFILE
Of course you should again replace your username and password by whatever you want to have here, this is the information you also need to provide when setting up the connection on your client!
IPsec
Now there are quite a few steps to be done here, but they’re all easy and self explanatory. In this section I’ll simply provide the code required for each step, everything can be found under the IP -> IPsec tab on your Winbox application
ip ipsec proposal set default auth-algorithms=sha1 enc-algorithms=3des,aes-256-cbc,aes-256-ctr lifetime=00:30:00 pfs-group=modp1024

ip ipsec peer profile set default hash-algorithm=sha1 enc-algorithm=aes-128,aes-256,3des dh-group=modp1024,modp2048 proposal-check=obey lifetime=1d nat-traversal=yes dpd-interval=120 dpd-maximum-failures=5

ip ipsec policy add action=encrypt ipsec-protocols=esp sa-src-address=0.0.0.0 sa-dst-address=0.0.0.0 proposal=default protocol=all template=yes group=default

ip ipsec peer add address=0.0.0.0/0 profile=default auth-method=pre-shared-key exchange-mode=main-l2tp passive=yes secret=InsertYourPreSharedKeyHere policy-template-group=default send-initial-contact=yes my-id=auto generate-policy=port-override
Again, be sure to change the PreShared Key here, you will need this when configuring your VPN connection on your client.
Almost there! Firewall up ahead!
It’s very important to note that you should place all your newly created firewall rules ABOVE any drop rules for them to be used. Firewall rules work top to bottom, meaning that the first rule that applies to the traffic gets applied, skipping any following rule.
Input rules
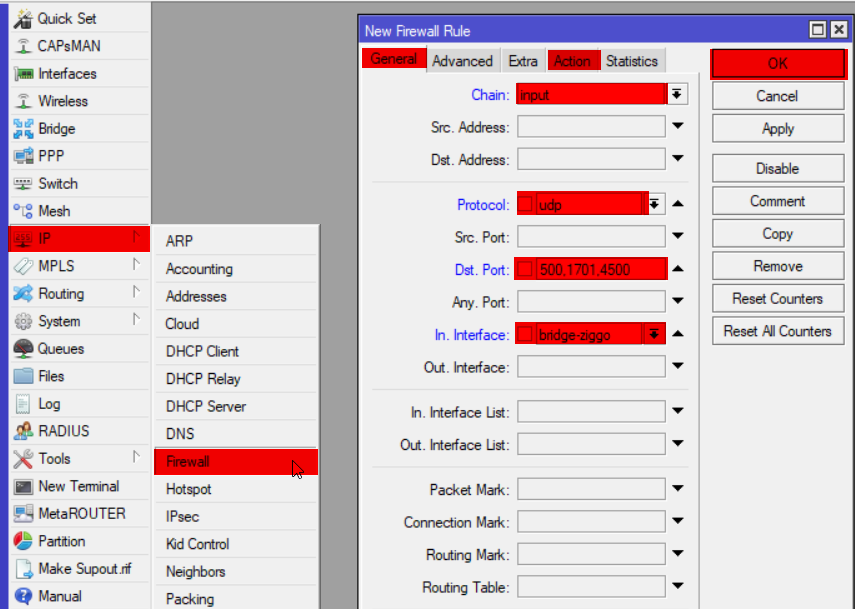
ip firewall filter add chain=input action=accept protocol=udp port=500,1701,4500 in-interface=bridge-ziggo log=yes log-prefix="vpn-in" comment="Allow L2TP VPN"
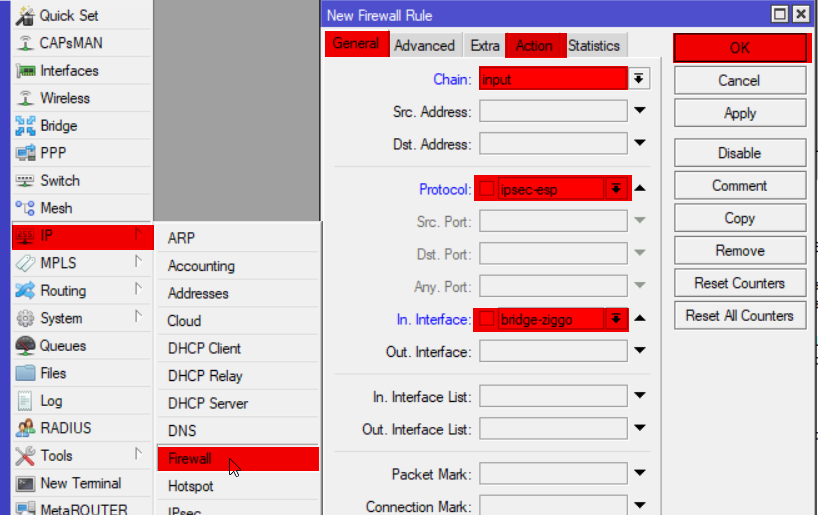
ip firewall filter add chain=input action=accept protocol=ipsec-esp in-interface=bridge-ziggo log=yes log-prefix="vpn-in" comment="Allow IPsec ESP"
Forward rules
Now depending on your needs you might want to lock this down more or just do one bit and not the other [either provide access to internet for safe remote browsing or just provide access to LAN for resources], but in my case I’ve configured both
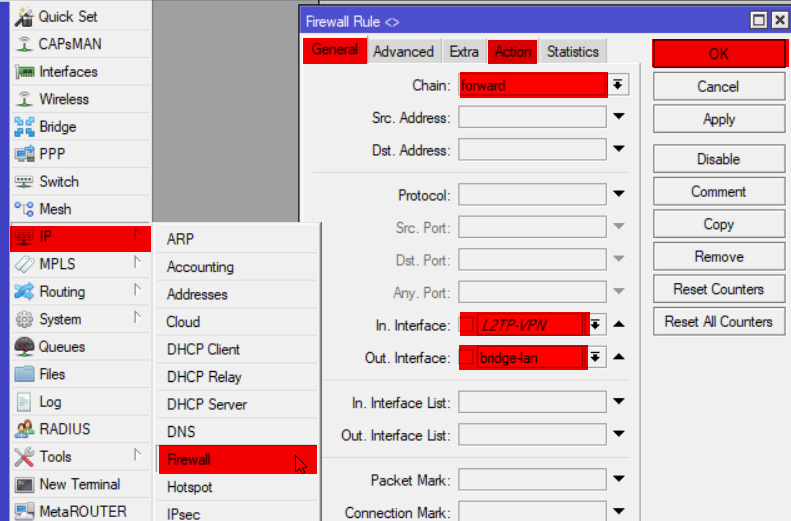
ip firewall filter add chain=forward in-interface=L2TP-VPN out-interface=bridge-lan action=accept log=yes log-prefix="vpn-in" comment="VPN to LAN"
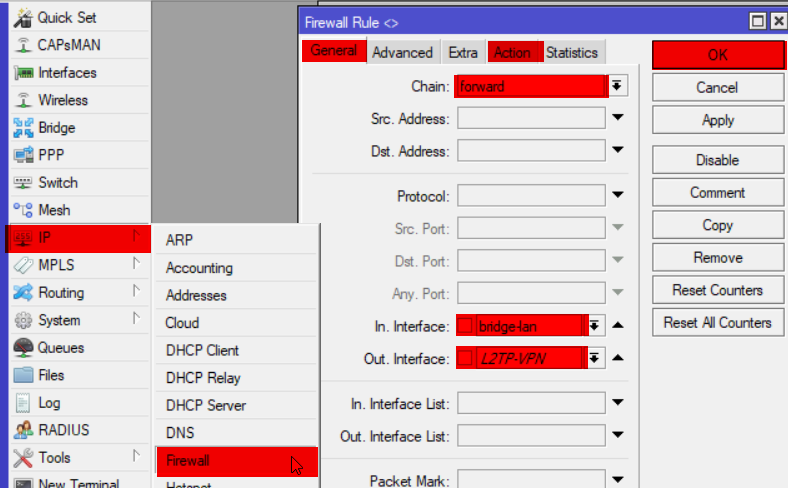
ip firewall filter add chain=forward in-interface=bridge-lan out-interface=L2TP-VPN action=accept log=yes log-prefix="vpn-in" comment="LAN to VPN"
Now for VPN to Internet you will have the exact same setup as before, only your interface will be the WAN facing interface, in my case bridge-ziggo.
Here’s the code for both entries just in case.
ip firewall filter add chain=forward in-interface=L2TP-VPN out-interface=bridge-ziggo action=accept log=yes log-prefix="vpn-in" comment="VPN to Internet"
ip firewall filter add chain=forward in-interface=bridge-ziggo out-interface=L2TP-VPN action=accept log=yes log-prefix="vpn-in" comment="Internet to VPN"
Are we there yet?
Now the final thing we should do is set proxy-arp in order to properly access all LAN devices. Thanks for the help Mateusz Czerniawski!
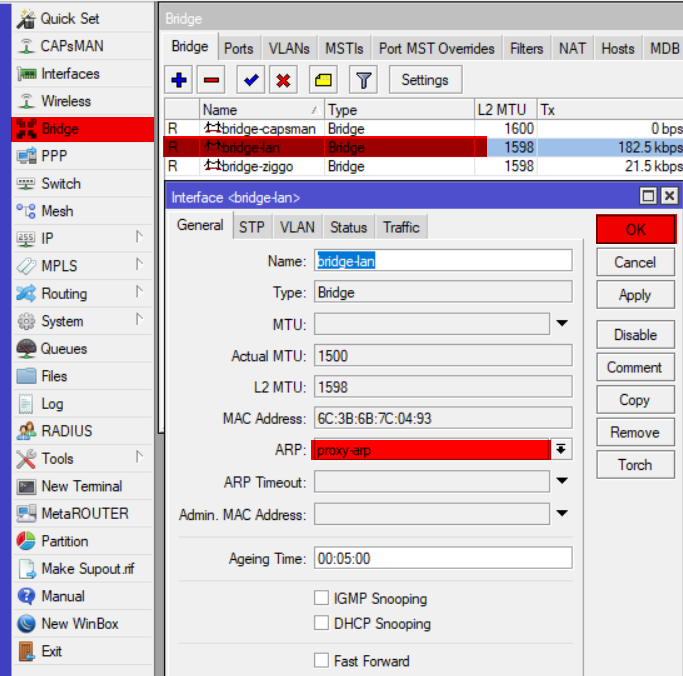
interface bridge set bridge-ziggo arp=proxy-arp
That’s all!!
Now I know it seems like a lot, but that’s because of the code and screenshots. Now that I look at it myself, it’s not that bad… But perhaps it can be of help to someone else now too!
Happy Scripting! 🙂